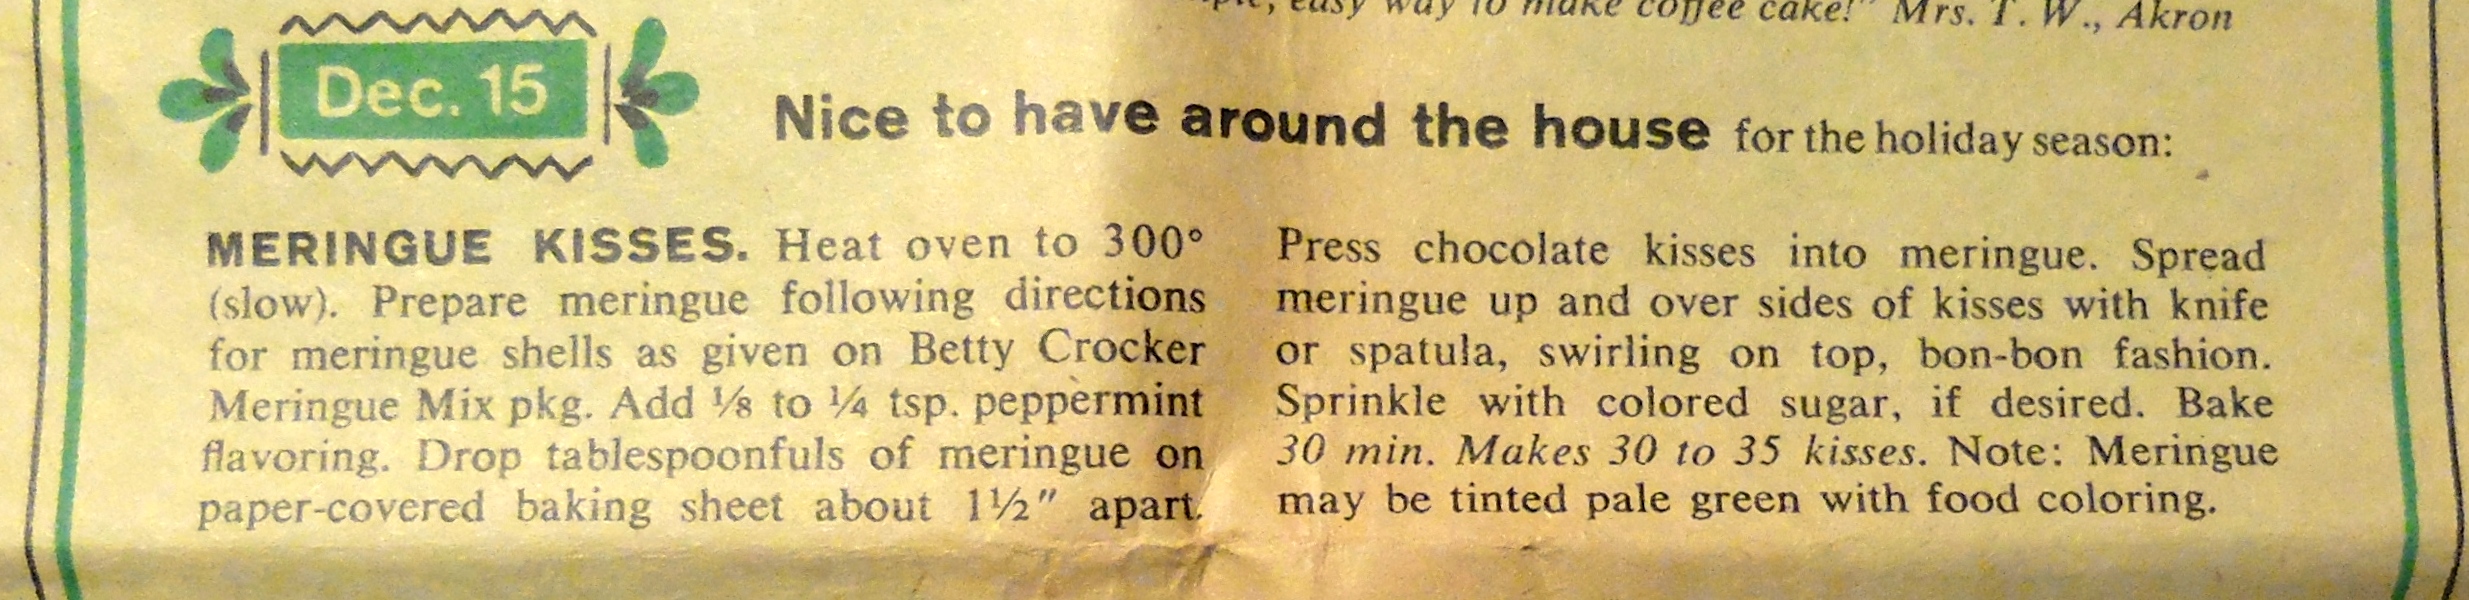
Holiday Almanac December 16: Chocolate Mallow Fudge

For more information on the Holiday Almanac, go hereOr to see what I've been up to on past Holiday Almanac days, check out this page.

When I was in 6th grade, there was an extra credit science project for my class that involved making two different kinds of fudge with two different methods to show the difference in texture between two different types of igneous rocks.

Despite the fact that my science average that year was something like a 98%, I (of course) wanted to do any project that involved cooking, so I made two batches of fudge and brought them in for my class. But I must have done a terrible job of explaining what the point of the project was (ONE BATCH OF FUDGE WAS COOLED QUICKLY AND SO IT BECAME GRAINY! THE OTHER BATCH COOLED SLOWLY AND WAS THICK SO IT'S TEXTURE WAS DIFFERENT!), because after my whole class had tasted it, I asked my best friend what she thought of it, and her only response was 'well, it tasted kind of... sandy.'

And therein ended all future forays into the world of fudge-making, until this week, when I had to attempt again. My fudge this time around tastes sandy again, despite not having been made with the intention of looking like igneous rock, and it's bitter and somehow too dark, despite being made with a marshmallow base.

The verdict:

1 spoon out of five. Maybe if you like fudge, it would be ok, but I think it's too dark, too bitter, and too grainy. Find yourself a better recipe, or, if you wait long enough, I'm sure I'll find one for you.

The recipe:

Chocolate Mallow Fudge

the directions:

Grease a square pan and set aside.
In a saucepan, combine sugar, butter, milk, and marshmallows.
Cook over low heat, stirring constantly until the sugar is dissolved and marshmallows are melted.
Boil 4 minutes, stirring constantly.
Add chocolate, turn heat to low, and stir until partly melted.
Remove from heat and stir quickly until chocolate melts.
Pour into prepared pan and allow to cool.
Cut into squares.

Makes 2 pounds.

the ingredients:

2 c sugar
¼ c butter
¾ c evaporated milk
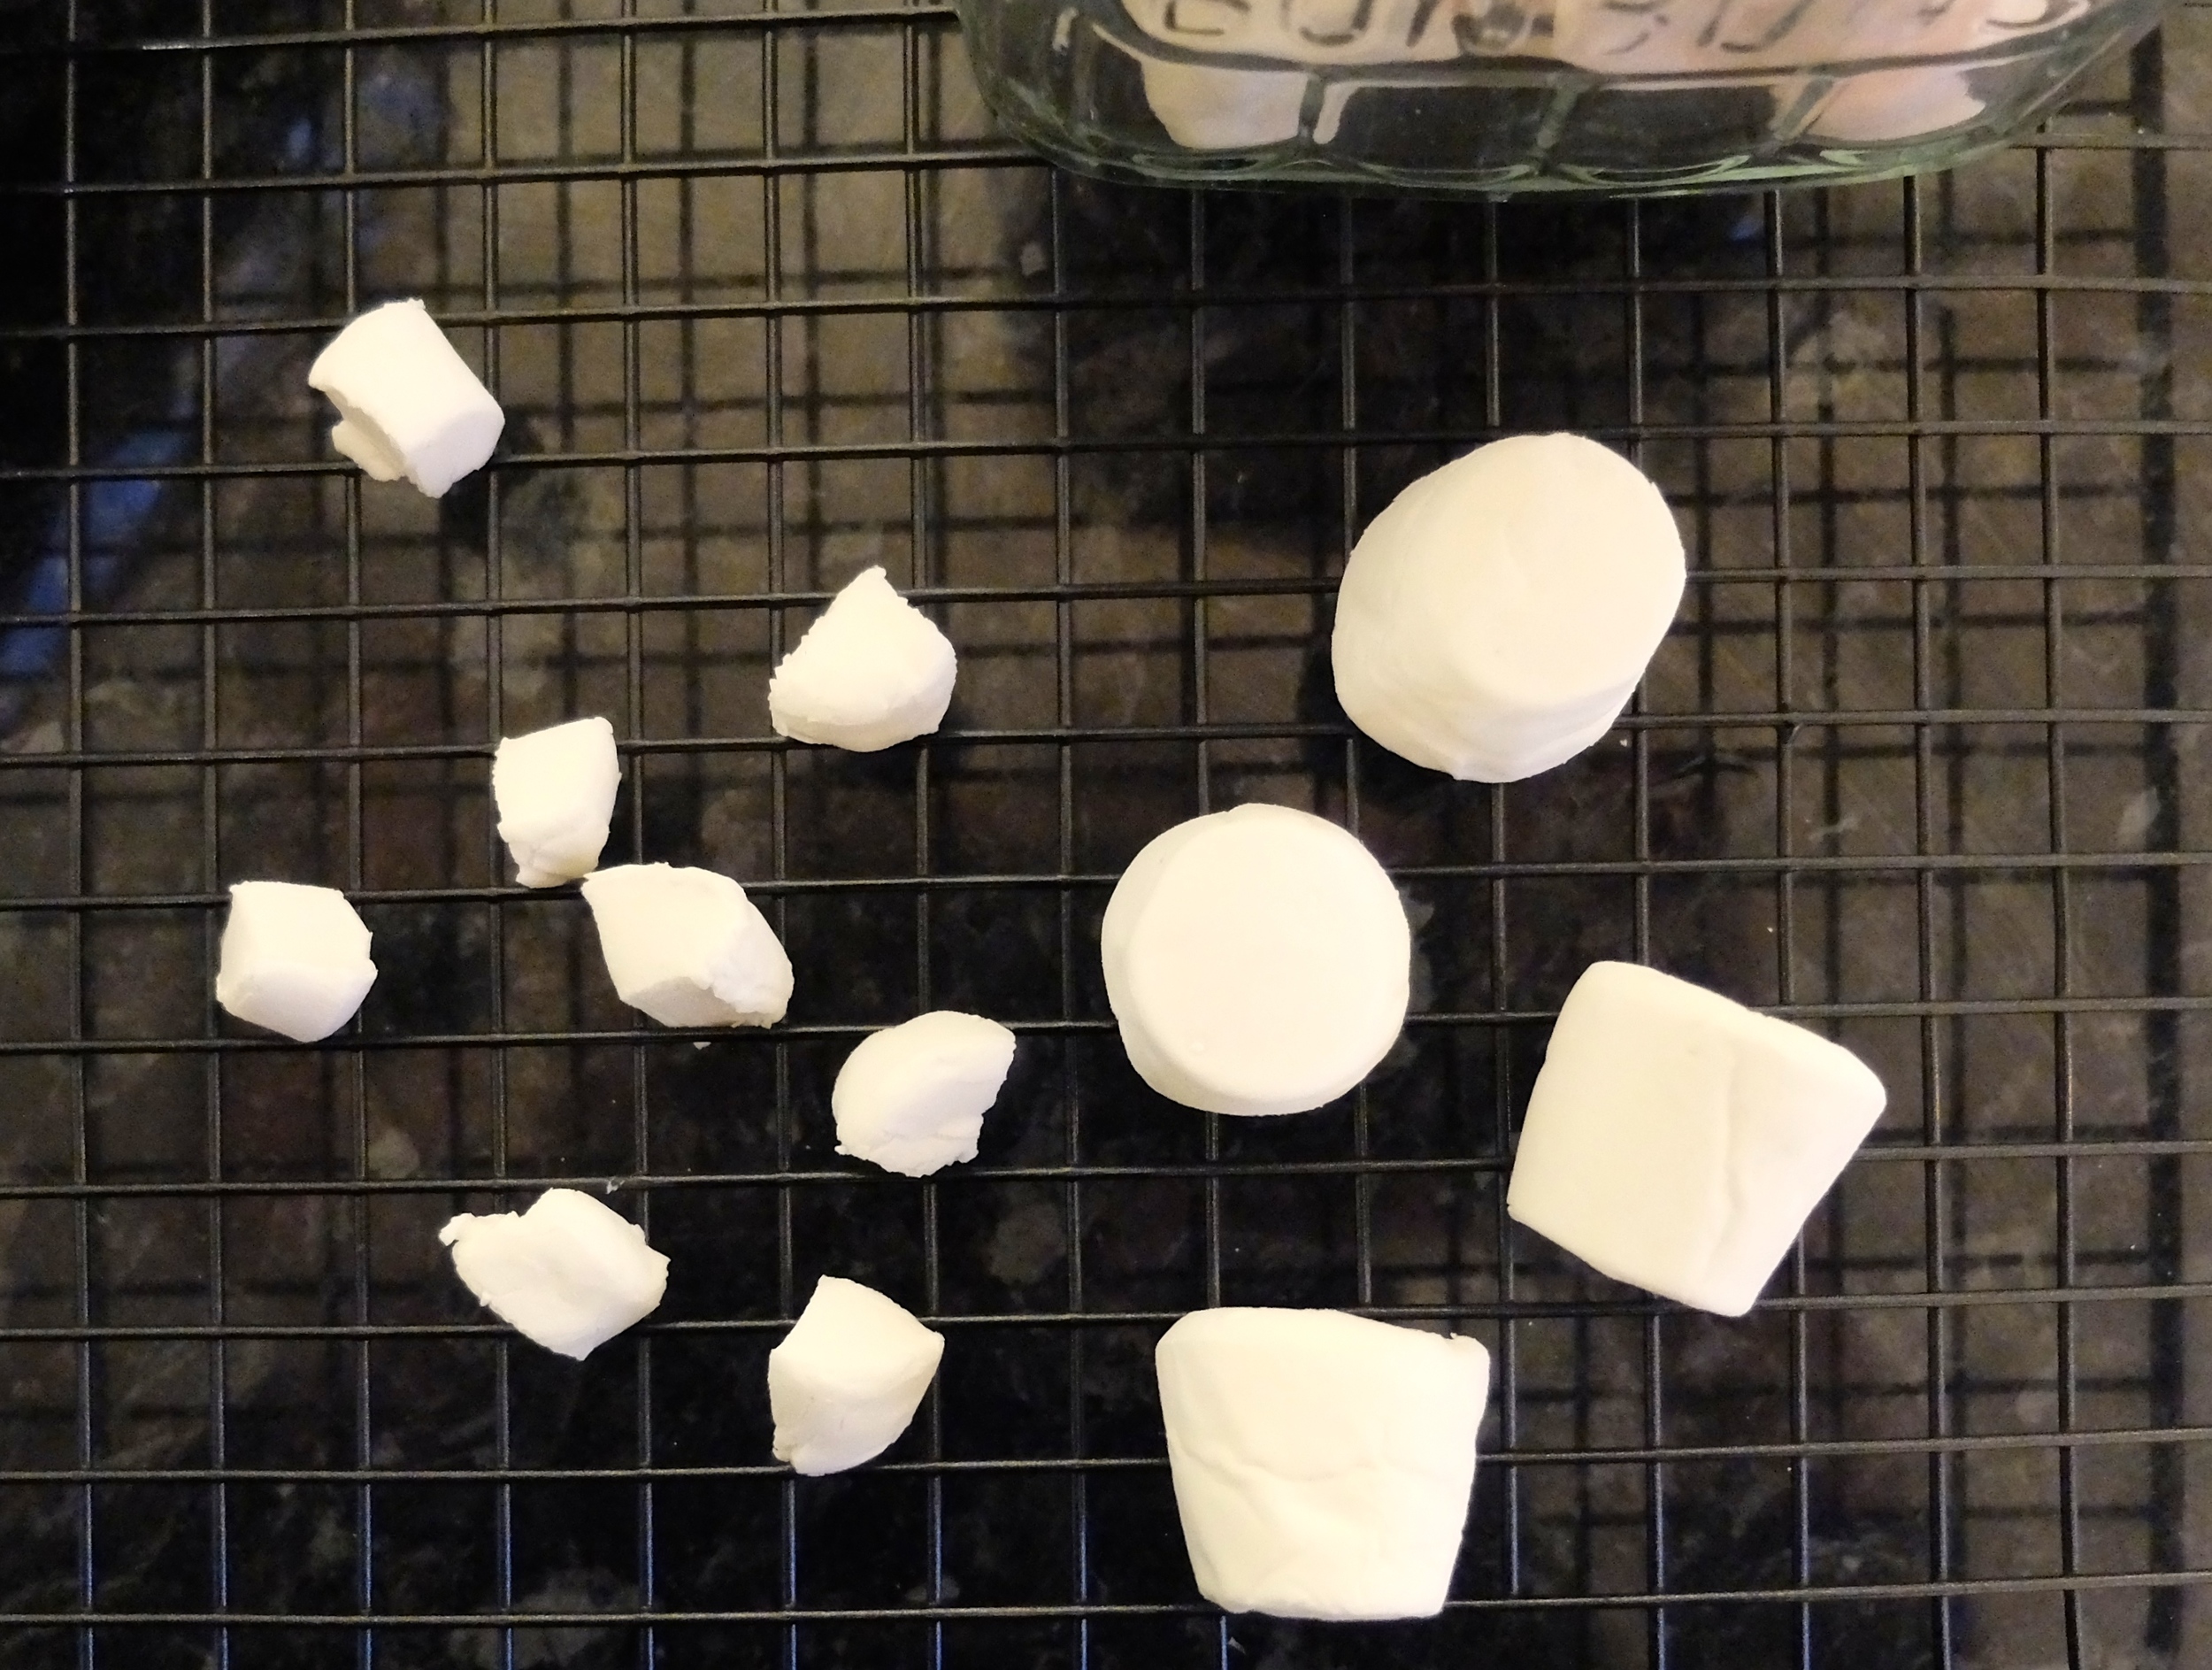
9 marshmallows, cut into eighths
8 oz semisweet chocolate

Holiday Almanac December 15: Meringue Kisses

For more information on the Holiday Almanac, go hereOr to see what I've been up to on past Holiday Almanac days, check out this page.

Meringues are something I didn't appreciate while living in France, and I don't think I had ever actually had one at all until a dear friend introduced me to them while on a road trip four years ago. How had I missed out for so long? The answer is simple: I grew up in Florida, where the humidity is so bad that there would be no way to keep a meringue crunchy even by the time you got it out of the oven, much less for long enough to take it to a party.

Consequently, I'm still pretty new to the meringue game (though living in the UK is rapidly catching me up: they're a major part of the British dessert scene). This is the first time I've ever made my own, so I defaulted to a Jamie Oliver recipe since I can't buy 'meringue mix' from the supermarket (also, what would that even be? Just a box of powdered egg whites?? Eww).

Before this week, I was never too sure what the texture of a meringue was supposed to be, honestly. But then I did some research, and Martha Stewart, that great oracle of baking usefulness, says that they can be either chewy in the centre or crunchy all the way through. I prefer them chewy, personally, but having never made them and knowing they're a little temperamental, it's nice to know that they can go either way.

Anyway, if you can get your hands on Hershey's Kisses, then make a batch of these mini meringues with Kisses sunken into them and you'll love them.* (And OMG, if you live Stateside and can get those peppermint Hershey's Hugs they sell at Christmas, they would be amaaaaaazing here). But if you live here in the UK, you can either use Dairy Milk Buttons or chocolate chips, either one works!

*Fun fact: In my office, whenever someone goes on vacation, they bring back Hershey's Kisses for the office as a foreign treat. But so far no one has brought them back from the US-- only from Singapore, Thailand, Australia, and Japan.

The verdict:

5 spoons out of five. These are so much easier than I thought they would be, and with only 3 ingredients (plus an optional fourth as garnish), they couldn't be faster or cheaper. Seriously, make these! (Or if you don't need a whole bunch, make one giant one and serve it at your next dinner party topped with whipped cream and fruit. Pavlovas are where it's at!)

The recipe:

Meringue Kisses

(adapted from Jamie Oliver's Cook with Jamie)

the directions:

Preheat oven to 150C/300F and line two cookie sheets with parchment paper.
Separate the eggs very carefully and make sure there are no yolk bits in the whites.
Beat eggs on medium speed until stiff peaks form (in Jamie Oliver's words, you'll know stiff peaks have formed when you can turn the bowl upside down over your head and nothing falls out).
Once this has happened, with the mixer still on, gradually stir in sugar and salt.
Keep mixing on medium-to-high speed for 5-7 minutes until meringue is glossy and smooth.
When mix looks smooth, dip your finger in it and rub to be sure it's totally smooth (this takes awhile).
Be careful not to overmix as meringue will collapse.
Dollop heaping tablespoons onto paper-lined cookie sheets and press chocolate candy into the centre of each meringue.
Use the back of a spoon to cover the chocolate completely with meringue.
Bake meringues for 30-40 minutes until they are firm on the outside, slightly tan, and they lift easily from the parchment.

the ingredients:

3 egg whites
½ c + 2 ½ tbsp sugar
1 large pinch of salt
Handful of Hershey's Kisses or Dairy Milk Buttons (optional)

Holiday Almanac December 14: Pull-Apart Coffee Cake Wreath

For more information on the Holiday Almanac, go hereOr to see what I've been up to on past Holiday Almanac days, check out this page.

There are few things in life I love more than breakfast food (cheese, wine, and Mexican food being among the exceptions, which is why my heaven is a plate of huevos divorciados with a mimosa on the side), so I was stoked to make this coffee cake, and it did not disappoint.

If you're thinking this is going to be similar to cinnamon rolls because of the appearance, think again. While it is a yeasted, stretchy dough with a butter and brown sugar filling, the dough is just barely sweetened and the entire filling takes only 2 tablespoons of brown sugar. Plus, the glaze that goes on it is just drizzled lightly over the top, so the top of each slice is slightly sweeter, but the entire thing isn't sopped in icing like a typical cinnamon roll (oh, and there's no cinnamon). I couldn't get my hands on candied fruit, so I used dried currants, but this would be amazing with dried cherries, or sultanas or raisins if that's more your thing. I've also been brainstorming a version with snipped dried apricots and a lavender drizzle because I just can't leave well enough alone. I had to back out a substitute for Bisquick since I can't get my hands on that over here in Scotland, but if anything, I think it made the whole thing taste even better, so I left the substitution listed below.

DSCF4830.jpg

It’s only lightly sweetened so you won't have a sugar crash an hour after you eat it, and it would be just as tasty without the glaze, so you could lighten the sweetness even more by omitting it. It’s insanely easy to roll and shape and it rose like a charm, even in my freezing-cold Scottish kitchen. Best of all, though, it’s beautiful, festive, and cosy: perfect fare for this time of year!

The verdict:

5 spoons out of five. It's moist and delicious, decadent without leaving you feeling like you gained a kilo just from one slice, and it looks adorably Christmas-y this time of year!

The recipe:

Pull-Apart Coffee Cake Wreath

the directions:

In a large bowl, dissolve yeast in warm water.
Mix in egg, sugar, flour, baking powder, salt, and oil.
Beat vigorously until dough comes together.
Turn dough onto flour-covered surface and knead until smooth, about 18-20 times.
Roll into a large rectangle (A3-sized or around 16”x9”).
Spread with soft butter and sprinkle with brown sugar.
Sprinkle dried fruit and walnuts evenly over the surface.
Roll up tightly, beginning at the wide end.
With the seam on the bottom, pinch ends of the roll together to form a ring.
Using kitchen scissors, cut ¾ of the way through the ring at 1” intervals, then carefully rotate each section 90 degrees so the spiral is facing upwards.
Let rise in warm place 1 hour, covered loosely with a towel.
Bake 15-20 minutes until light golden brown.
Set aside to cool completely.
Once cake is cooled, make the glaze by mixing together powdered sugar, vanilla, and milk until you have a thick but still runny glaze.
Drizzle over the cooled cake and serve.

the ingredients:

2 ¼ tsp yeast (if you're Stateside, this is one packet)
½ c warm water
1 egg
1 tbsp sugar
2 ½ c flour
3 ¾ tsp baking powder
1 ¼ tsp salt
6 ¼ tbsp vegetable oil
2 tbsp butter, softened
2 tbsp brown sugar
1/3 c dried fruit of your choice
½ c walnuts, chopped
1 c powdered sugar, sifted
¼ tsp vanilla
1-2 tbsp milk